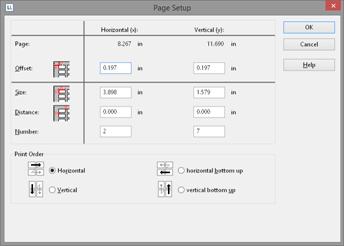
You can also define your own label formats if you can't find the layout that you want among the templates. You can make the required settings with the "Layout Definition" region property; there is a special dialog for this:
§ Offset: The offset specifies the horizontal or vertical distance of the upper left label to the margin of the chosen page region (physical/printable)
Note: In the screen display, the upper left corner of the workspace always starts at coordinates 0/0 irrespective of the chosen page size and specified offset. However, you will see the effect of the offset in the preview or when printing.

Figure 8.4: Defining customized label layouts
§ Size: This value defines the size (horizontal=width / vertical=height) of the label.
§ Distance: The distance to the next label is specified here. With single-column labels, only the vertical distance must be entered.
§ Number: This option specifies the number of labels per page (horizontal number = number of columns per page, vertical number = number of rows per page).
§ Print Order: Specifies the order of the print if multiple labels are printed on a page. Possible values: 0 (horizontal), 1 (vertical), 2 (horizontal bottom up), 3 (vertical bottom up).
The default is to print labels row by row from the upper left to the lower right (horizontal). However, in the case of sheets of labels that have already been started, it is possible that the first label row has already been used. This causes a loss of stiffness in the upper part of the sheet. Many printers have problems feeding in sheets that have already been started, resulting in a paper jam. In this case, it helps to print the labels in reverse, from the bottom upwards instead of from the top downwards. In this way, the upper row of labels on the sheet is always printed as the last and the sheet retains the stiffness required for feeding in.
See also:
![]() Saving your own label formats in the label template list
Saving your own label formats in the label template list