You can output free text before and after a table. To do this, use the RTF object and link the object to the project as free text via the report container.
1. To add a new element to the report container, select the "Append an element" or the "Append a sub-element" button in the "Objects" tool window.
2. A selection dialog will appear for the chosen object type. Choose the "Table" object type.
3. In the following dialog, select "Free content" as the data source.

Figure 5.23: Add free content to the report container
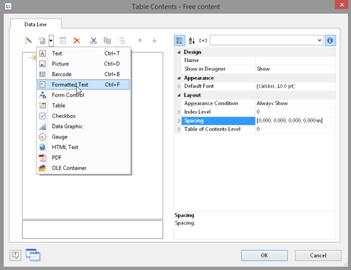
4. Then add a column via the properties dialog for the table object. In our case, we want to create the covering letter as formatted text. Therefore, click the small arrow on the right of the button and choose the Formatted Text option.

Figure 5.24: Specifying formatted text for the content of the column
5. A dialog appears where you can type in the covering letter in the form of continuous text.
6. Please don't forget to remove the (column) frame for free content. The best way is to remove the frame via the "Default Frame" property in the element properties.
7. You may also have to change the layer condition as the covering letter will now be output on the first page.
8. If the General Terms and Conditions are also to be output at the end of the invoice, you must add another free content object to the container after the item table. Then you have several options:
a) Use the Formatted Text object here as well.
b) Use the PDF object and include the General Terms and Conditions in PDF format.
c) Use the LoadFile$() function to load a linked file and enter the path of the file as the parameter as follows LoadFile$ (ProjectPath$()+"\gtc.txt").
d) For the issue on a reverse side, see Reverse Side in Chapter Report Sections.